Doing it Right: Explaining the Refurbishing Process
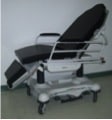
When you are doing something right, you know inside yourself. You can feel it. It’s a mindset of quality and determination to not stray to easier methods that aren’t quite as effective. Whether this is cleaning your windows at home on a Saturday afternoon or writing blog posts. When we refurbish a stretcher,  it’s really not any different. We have tried to create a culture of caring about our products and their quality with all of our employees, from the front office personnel to the production floor technicians where the stretchers are refurbished. Over time we have revised and tweaked our processes to help insure that our customer are not only saving money by buying refurbished, but receiving and excellent product that will give them years of dependable service. This all starts from the moment the stretcher is pulled from our stock and brought to the production floor.
Step one
The stretcher goes on a whirlwind journey of cleaning, sanding and painting to restore its cosmetic appearance. Mechanically the stretcher components are checked for wear and function and adjusted or replaced as necessary. Here is a quick summary of the process.
Step two
Once the stretcher is sold it is pulled from stock and assessed for parts needed. The stretcher is then disassembled and the base and frame are sanded and painted. Not wiped down with 409 or Fantastik, but sanded and repainted with high quality automotive grade acrylic paint.
Step three

While the sanding and painting are taking place, another technician disassembled the hydraulic jacks that raise and lower the stretcher and replaces the seals, o-rings and other wearable items. He will then re-assemble the jack and weight test them.
Step four

The stretcher is then reassembled. New bumper strips and labels are placed on the stretcher. All functions are checked for proper operation, including the braking system, steer function, side rails, backrest and all hydraulic functions.
Step five
 The stretcher then moves out of the production department and into our service department where the stretcher is placed through a quality assurance inspection. The service technician performing the QA procedure uses a checklist to methodically insure that all functions are working properly. They also use a good dose of common sense and looking at the stretcher from the customer’s point of view to see if there are any flaws or problems that should be addressed.
Done!
 The result is a stretcher that has been refurbished to the highest standards and double checked prior to shipping. We receive customer e-mails frequently not because of problems, but telling us how much they love their stretcher and how great it looks. We call it the “Wow” factor here. You know when you’re doing something right, but when the customer goes out of their way to confirm that, it just makes you feel so proud of the job your doing.
Conclusion
So, there you have it! This is the whole refurbishing process for one of our stretchers. Refurbished stretchers are a great option for any hospital, surgery center, or plastic surgery center. If you have any other interest in refurbished medical equipment just let us know!
Thanks for the reading,


It’s a good post.It’s a good post.
Hello,
Thank you!
Thanks for reading 🙂
-Venture Medical
I like the valuable info you provide to your articles. I will bookmark your weblog and take a look at once more right here regularly. I am rather certain I will learn plenty of new stuff proper here! Best of luck for the next!
whoah this blog is magnificent i love reading your posts. Keep up the good work! You know, a lot of people are searching around for this info, you could help them greatly.
Definitely, what a splendid website and informative posts, I will bookmark your blog.All the Best!
nice and thanks.